
Building a deck with reclaimed wood is more than a practical choice. It is a way to bring history into the landscape of your home. Boards that once supported barns, factories, or old timber frames carry a richness that new lumber cannot imitate. When selected with care and prepared correctly, reclaimed wood can deliver strength, longevity, and a surface filled with character.
This guide walks you through the essentials: why reclaimed wood matters, how to source truly worthy pieces, and what it takes to prepare and protect them for outdoor use. You will also learn the construction techniques that help a reclaimed wood deck perform for years, along with simple maintenance habits that preserve its story. If you want guidance in choosing authentic reclaimed materials, Bourgeois Materials can help you find boards with integrity, history, and lasting beauty.
Using reclaimed wood for your deck saves resources, adds unique character, and can offer stronger, longer-lasting boards than many new options. You get eco advantages, visual interest, and often better structural performance when you choose the right reclaimed species.
Choosing reclaimed wood cuts demand for new lumber and keeps usable material out of landfills. When you source barn beams, factory timbers, or reclaimed oak, you reduce the need for fresh logging and the energy tied to new milling and transport.
Reclaimed pieces often come from dense, old-growth trees that no longer exist in commercial supplies. That means the wood already has tight grain and natural stability without new harvesting. Buying from salvage yards or reuse centers also supports local reuse economies and lowers your project’s embodied carbon.
Inspect moisture content (aim for 12–19%), nails, and rot before installation. Treat and seal the boards for outdoor use so they last outdoors while keeping the sustainable benefits intact.
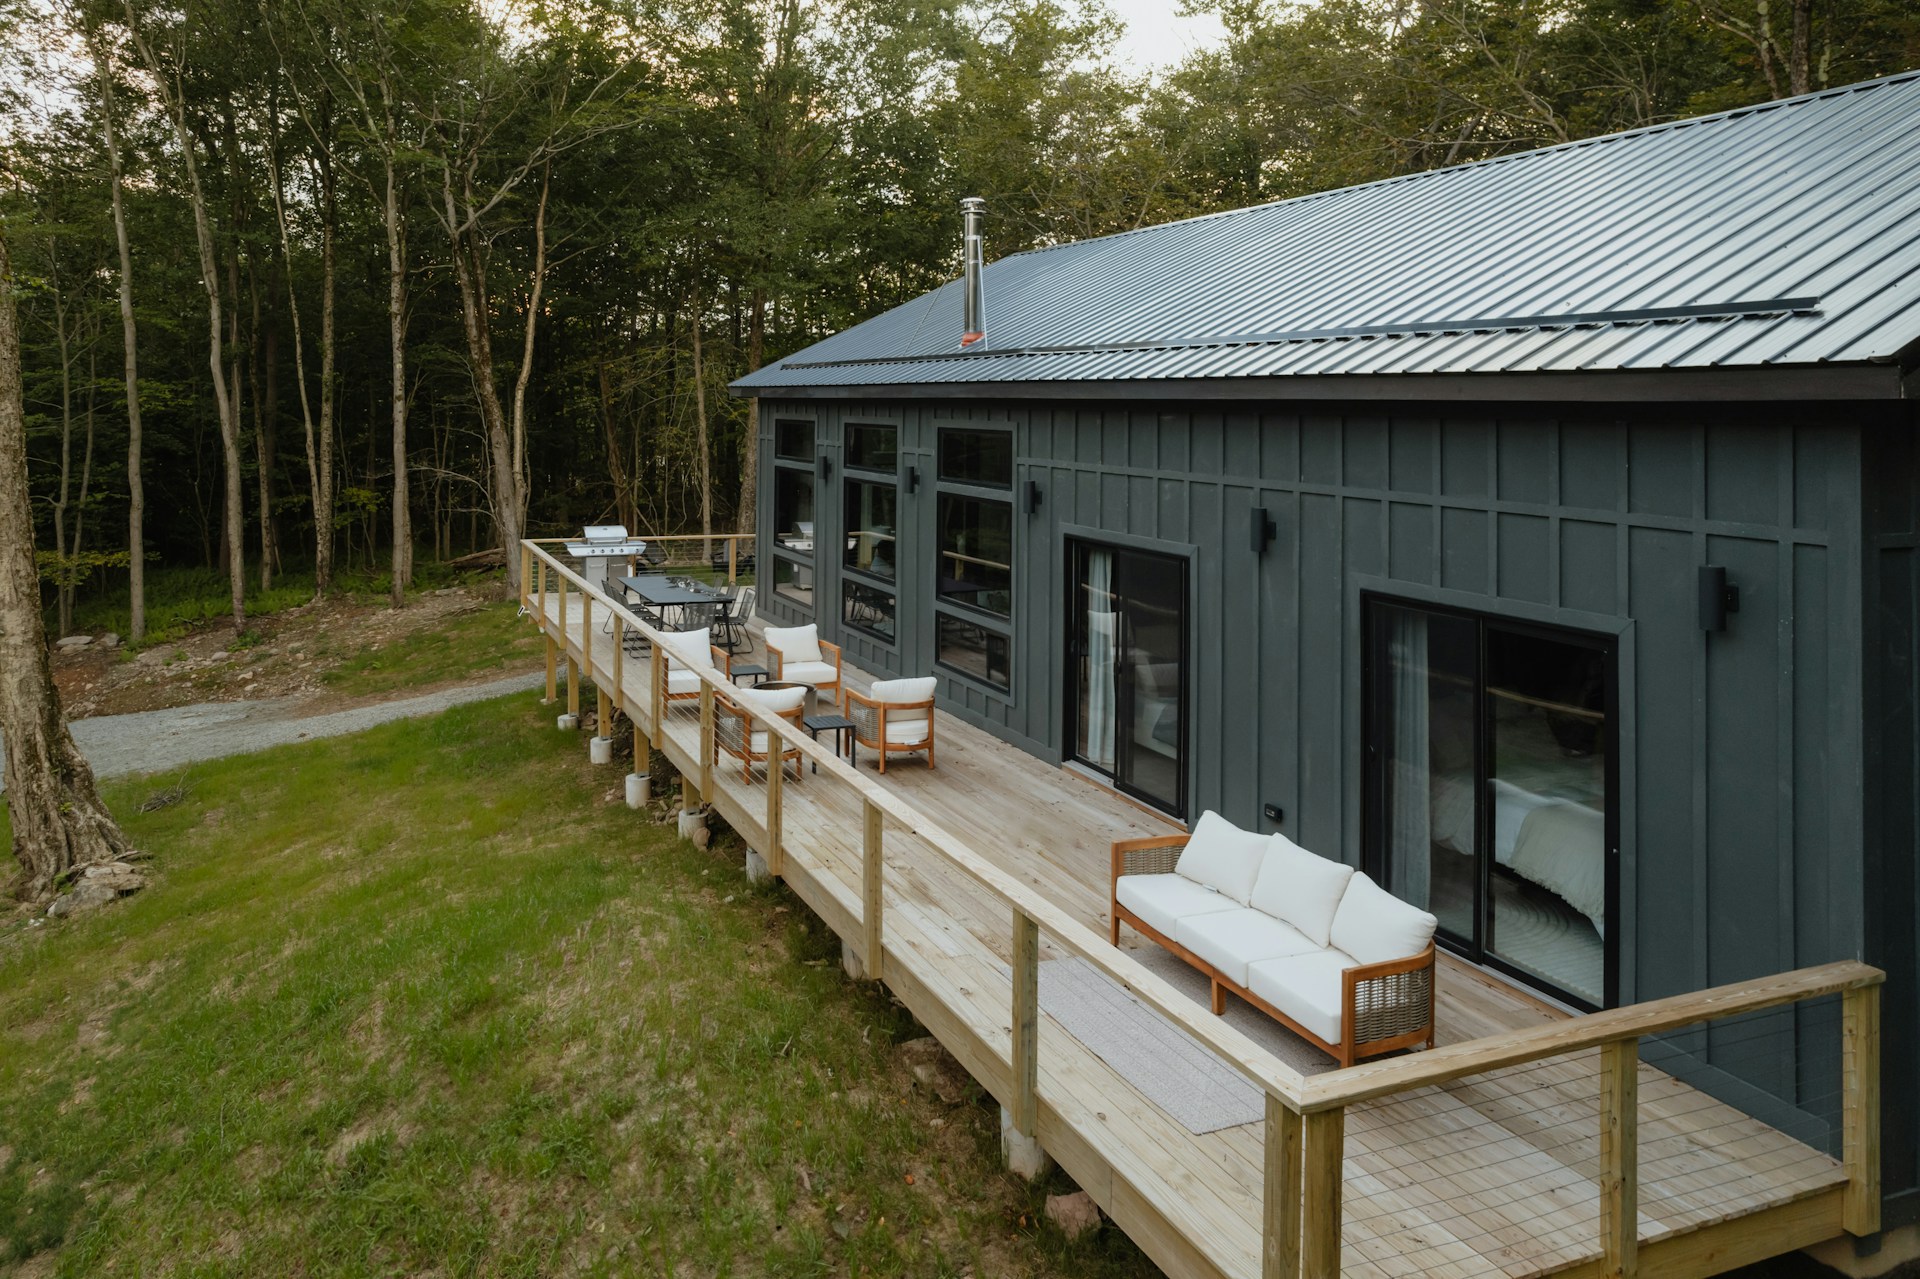
Reclaimed wood gives your deck a look you can’t copy with new boards. Weathered patinas, old nail holes, and varied grain create a rich surface that highlights history and age.
You can mix reclaimed oak with other salvaged species for contrast. Oak adds warm tones and visible grain, while barn wood brings darker, rustic patinas. Arrange boards to show knots or marks in focal areas like near stairs or seating to make the visual effect intentional.
Because each board is unique, you can design patterns—mixed-width runs, herringbone inserts, or framed inlays—to make your outdoor living space stand out. Plan layout before fastening to balance colors and textures for a cohesive result.
Older reclaimed timbers often outperform many new softwoods in strength and wear resistance. Reclaimed oak and heart pine were harvested from mature trees with tighter growth rings, giving them higher density and better load capacity.
Use structural-grade reclaimed beams for posts and joists when they pass soundness tests. Check for splits, insect damage, and embedded metal, and set aside weaker boards for non-structural uses like benches or planters.
Pair reclaimed decking with corrosion-resistant fasteners and a penetrating sealer. With proper prep—moisture testing, cleaning, and sealing—your reclaimed wood deck can resist rot and hold up to foot traffic and weather for many years.
Choose species that resist rot and insect damage, find reclaimed lumber from reliable sellers, and inspect each board for structural soundness and hidden hazards. Focus on dense hardwoods, vetted suppliers, and careful on-site checks.
Pick dense hardwoods like Ipe (Brazilian walnut), Cumaru (Brazilian teak), and Angelim Pedra when possible. These species resist moisture, decay, and insects better than most softwoods. Look for a Janka hardness rating above 1,500 when you can; higher numbers mean greater wear resistance for decking traffic.
Also consider salvaged oak and black walnut if you can confirm they’ve been properly repurposed. Avoid unknown softwoods unless they’re pressure-treated or thermally modified. If you can’t verify species, favor boards that are heavy for their size and show tight, closed grain.
Finish choices matter. Use penetrating oils or marine-grade sealers that allow the wood to breathe and reduce checking. That preserves the reclaimed patina while protecting the deck.
Start with architectural salvage yards and specialized reclaimed lumber dealers. These suppliers often remove nails, kiln-dry boards, and document species or previous treatments. Ask for origin and any testing they’ve done.
Check local demolition contractors, barn salvages, and reclamation projects for long-run boards. Online marketplaces and reclaimed-wood networks can work, but demand clear photos, dimensions, and proof of de-nailing and drying.
Buy from vendors that provide written guarantees about de-nailing, pesticide-free status, and moisture content. That reduces surprises during installation and keeps your deck safer.
Inspect each board for nails, screws, or embedded metal; use a metal detector if needed. Look for signs of rot, active insect damage, and excessive checking. Small surface nail holes and wear marks are fine; deep rot or large voids are not.
Check moisture content with a meter; aim for 10–15% before installation to limit movement. Measure straightness — boards that warp more than 1/4 inch over 6 feet will cause installation problems. Confirm board thickness and width match your design to avoid heavy planing or irregular gaps.
Ask about prior chemical treatments. Old CCA-treated lumber can pose health risks; discard or avoid boards that test positive. If a board passes your checks but has surface contaminants, plan to sand and refinish with a suitable outdoor sealer before fastening.
Plan the deck size, traffic flow, and key features before you buy materials. Think about where doors, walkways, sun, and shade fall so your layout supports dining, grilling, and lounging.
Measure the area from house walls to property lines first. Local codes may force setbacks or railing heights, so check those numbers before you finalize dimensions.
Decide activity zones: a 6–8 foot clear space suits a dining table, while a 4–6 foot zone works for a grill or lounge chairs. Place the main traffic path at least 3 feet wide to avoid crowding. Mark post and footing locations at 6–8 foot intervals for typical joist spans.
Plan board direction to control water runoff and match visual flow from the house. Leave consistent gaps (about 1/8–3/16 inch) for drainage and wood movement. Add access points for utilities and future maintenance, like removable boards over hidden fasteners or a hatch for under-deck access.
Sort reclaimed boards by strength and appearance before installation. Use structurally sound pieces for visible decking and reserve questionable boards for trim, planters, or benches.
Use new pressure-treated lumber for structural framing and joists to meet code and reduce long-term maintenance. Match thicknesses by planing or shimming to avoid an uneven walking surface. Fasten reclaimed boards with corrosion-resistant screws and pre-drill close to edges to prevent splitting.
Treat reclaimed wood with a penetrating sealer after installation and test a sample board first. When mixing species, place similar grains and colors together to create balanced visual zones. Label all pieces during layout to keep orientation and avoid surprises mid-install.
Choose furniture that complements the reclaimed wood’s tone and wear. Metal frames with weather-resistant cushions perform well and reduce stress on the deck surface.
Anchor heavy pieces and plan clearance: leave 18–24 inches behind dining chairs and at least 30 inches for walkway aisles. Use felt pads or rubber feet under legs to prevent scratching and water traps at contact points.
Consider built-in solutions like benches or planter boxes made from leftover reclaimed boards to save space and create cohesive style. Add furniture zones near power or lighting for convenience, and allow 2–3 feet of circulation around each seating group for comfortable outdoor living.
Clean, remove old metal, and apply the right treatments so reclaimed lumber performs as decking material. Focus on thorough cleaning, careful hardware removal, and a weatherproof sealing system matched to the wood’s condition.
Sweep loose dirt and debris from each board. Use a metal brush or stiff bristle broom to remove flaking paint and loose surface grime. For deeper cleaning, mix oxygen bleach with warm water (about 1 cup per gallon) and scrub along the grain with a soft brush.
Pressure washing can damage aged fibers, so avoid high PSI. If you must use a pressure washer, keep it on low and stay at least 2 feet away from the wood. After cleaning, air-dry boards flat for 48–72 hours until moisture reads 12–19% with a moisture meter.
Light sanding (80–120 grit) removes rough spots and old finish without thinning the board too much. Target only areas that splinter or hold stains. Mark boards that show rot or large voids so you can reserve them for non-structural uses.
Scan boards with a handheld metal detector to find hidden nails and screws. Remove obvious fasteners with a cat’s paw, pry bar, or locking pliers. For bent or stubborn nails, use a hammer and drift pin to back them out slowly to avoid cracking the wood.
Cutters or an angle grinder work for deeply embedded spikes, but protect your tools and surroundings from sparks and metal shards. After extraction, fill large holes with exterior-grade wood filler or epoxy designed for outdoor use. Keep a record of boards where metal could not be removed; use those in low-risk, decorative places rather than load-bearing decking.
Inspect each board’s ends and edges for remaining metal fragments before cutting or planing. Wear safety goggles and gloves during this process to protect yourself from sudden metal ejections.
Treat the wood with a preservative suited for salvaged wood species. Use a penetrating, oil-based preservative that resists rot and insect attack for cedar, oak, or pine. Apply the first coat with a brush or roller, working the product into end grain and bolt holes where moisture enters.
Allow 24–48 hours drying between coats and re-check moisture content before installing. For UV and water protection, follow the preservative with two coats of a semi-transparent, UV-resistant deck sealer. Test the sealer on a small piece first because reclaimed wood can absorb finishes unevenly.
Fasten only with corrosion-resistant screws or hidden clip systems rated for exterior use to avoid future staining and failure. Reapply penetrating sealer every 2–3 years, and touch up worn areas after heavy weather events.
Build a stable frame, fasten boards correctly, and protect the wood from moisture and UV. Routine cleaning and inspections will extend the life of your reclaimed wood deck and keep it safe.
Start with pressure-treated or steel posts set on concrete footings below the frost line. Space posts every 6–8 feet for typical loads, and use 2x10 or 2x12 beams sized to span your joist layout. Install joists 16 inches on center and add blocking every 4 feet to prevent twisting.
Fasten joists with galvanized joist hangers and use hurricane ties where the ledger meets the house. When you attach the ledger, flash it and use thru-bolts or structural screws rated for exterior use. Double joists under seams and stair openings.
Sort reclaimed boards by thickness and strength before installation. Pre-drill holes near edges and use stainless-steel or coated deck screws to avoid corrosion from embedded old nails. Leave consistent gaps (1/8–3/16") for drainage and expansion. Use shims or a planer to even out thickness differences.
Check the moisture content of new boards; aim for 12–19% before sealing. Sweep debris weekly and rinse the deck with a mild oxygen-bleach solution every few months to remove mold and grime. Avoid pressure washing older boards because it can erode grain and weaken fibers.
Apply a penetrating oil-based sealer with UV inhibitors every 2–3 years. Test the sealer on a scrap board first since reclaimed wood absorbs differently. Reapply to end grain and cuts to prevent water wicking.
Keep planters and soil off the deck surface and maintain a 6-inch clearance from ground-level vegetation. Inspect railings, fasteners, and posts each spring. Tighten loose screws, replace rusted metal, and swap out soft or rotten boards promptly.
Document repairs with photos and notes to track recurring trouble spots in your sustainable building materials.
Warped or cupped boards are common with reclaimed wood. Lay warped pieces face-up and clamp or strap them overnight to reduce curvature before fastening. For persistent warp, use blocking or screws that pull the board flat.
Hidden nails and metal can damage blades. Scan boards with a metal detector and remove or mark embedded metal. When thickness varies, group similar boards or use shims to level the walk surface.
Rot and insect damage require early action. Press suspicious areas with a screwdriver; if the tip sinks easily, replace that board. Use decay-resistant recycled decking species when contact with ground is likely, and install flashing where the deck meets the house to divert water away from ledger and joist ends.
You can choose from modern recycled composites, bamboo, thermally modified wood, or aluminum to lower maintenance and environmental impact. Focus on material lifespan, recycled content, warranties, and installation needs when comparing options.
Recycled composite decking mixes reclaimed wood fibers with recycled plastics. Products often use film plastic, sawdust, and other reclaimed waste. Look for boards with high recycled content and a clear Environmental Product Declaration (EPD).
Composites need little upkeep: periodic soap-and-water cleaning and an annual inspection. They resist rot, insects, and splintering better than most natural woods. Many brands offer 25-year warranties on material performance and fade resistance.
When selecting boards, check slip resistance, heat retention, and board profile (grooved vs. solid). Also verify manufacturer recycling programs so the product can be reclaimed at end of life. These factors help you balance upfront cost with long-term value.
Trex is a market-leading composite that uses recycled plastic film and reclaimed wood byproducts. Its boards typically contain a high percentage of recycled content and come with 25-year residential warranties for stain and fade resistance.
Reclaimed wood offers unique character and lower embodied energy if locally sourced. It needs more maintenance: sealing, sanding, and quarterly inspections. Reclaimed boards may require replacement of damaged sections more often than composites.
If you want low maintenance and predictable performance, choose Trex or similar recycled decking. If you value authentic grain and historical patina, reclaimed wood fits better—expect higher upkeep and careful sourcing to avoid treated or damaged pieces.
A reclaimed wood deck invites weather, time, and craftsmanship to meet in a single place. When you build with boards that have already lived a lifetime, you create an outdoor space with depth, integrity, and a story that continues to unfold in the sun and rain. With the right preparation and steady care, reclaimed wood becomes a surface that lasts and a feature that grows more beautiful each season.
If you are ready to select reclaimed lumber with proven strength and authentic character, Bourgeois Materials can help you source pieces that honor the past and elevate the work you build today.
This section covers how to inspect, prepare, treat, and build with reclaimed wood. It also explains common structural and safety checks you should do before and after installation.
Clean boards with a wood-safe cleaner or oxygen bleach and rinse thoroughly. Let boards dry until the moisture content reads 12–19% with a moisture meter.
Remove all nails, screws, and embedded metal using a metal detector and pry tools. Fill large holes or damaged areas with exterior-grade wood filler; set aside severely damaged boards for non-structural use.
Sand rough areas with 80-grit then 120-grit to remove splinters and old finish. Test each board by pressing for soft spots and by supporting ends to check for load-bearing strength.
Reclaimed hardwoods like oak and heart pine can last as long as new hardwood when structurally sound and well-treated. Durability depends on species, prior exposure, and how well you remove rot and contaminants.
Proper drying, sealing, and regular maintenance extend service life. Expect to reseal every 2–3 years and inspect annually for localized repairs.
Use a penetrating oil-based sealer or preservative made for exterior, weathered wood. Choose a UV-resistant product to reduce sun damage and a water-repellent to limit moisture uptake.
Apply two thin coats, allowing 24–48 hours between coats and 72 hours before heavy use. Test the product on a small piece first because reclaimed boards may absorb finishes unevenly.
Watch for hidden rot, insect damage, and material fatigue from prior loads. Boards with deep cracks, large voids, or extensive rot should not be used for load-bearing members.
Verify joists and posts are new or certified sound; use reclaimed wood mainly for decking, railings, or decorative elements unless you can prove structural capacity. Follow local building codes for span, joist spacing, and railing height.
Use new, code-compliant hardware (galvanized or stainless steel) for all connections. Pre-drill holes to reduce splitting and use 3-inch exterior-rated deck screws or structural fasteners at each joist intersection.
Inspect fasteners and boards yearly, clear debris weekly, and replace any soft or separated boards promptly. Keep plants and soil at least 6 inches from deck surfaces to reduce moisture buildup.
Check species and grain tightness; denser, tighter grain woods like oak, heart pine, and Douglas fir work best for decking. Measure moisture content with a meter and reject boards above 19%.
Inspect for signs of chemical contamination such as paint with lead or heavy industrial stains, and avoid contaminated pieces. Purchase from reputable salvage yards that can document origin or provide graded stock when possible. For more information, see this guide to buying antique bricks.